5.2. Configuring the DataHub instance for the server
Configuring tunnelling on the server side comprises two tasks: making the OPC server connection and configuring the tunnel/mirror connection.
Configure the DataHub OPC DA connection
![[Note]](images/note_1156523861.png) | |
If you are tunnelling OPC A&E, please see OPC A&E Client for this part, and then continue with Configure the DataHub instance as tunnelling master below. |
The DataHub instance on the OPC DA server machine will act as an OPC client. You should configure it as follows:
Right click on the DataHub system-tray icon and choose .
In the Properties window, select OPC DA.

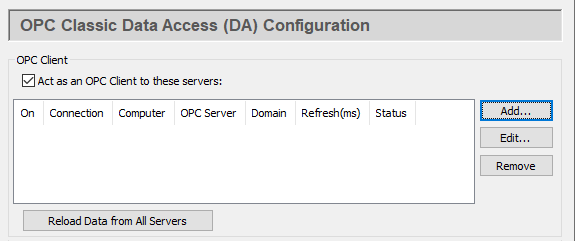
Check the box. Since a DataHub instance can be a client to more than one OPC server, you need to specify which OPC DA server you are going to connect to. To add a server, click the button and fill in the fields in the Define OPC Server Window:

Type in or select the necessary information as appropriate.
The first four fields define the OPC server:
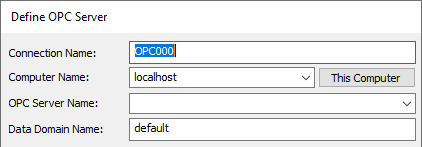
Connection Name Type a name to identify this connection. There should be no spaces in the name. It doesn't matter what name is chosen, but it should be unique to other connection names.
Computer Name Type in or select from the drop-down list the name or IP address of the computer running the OPC server you want to connect to.
OPC Server Name Select the name of the OPC server that you are connecting to from the list of available servers.
Data Domain Name Type the name of the DataHub data domain in which the data points will appear.
You can specify how the data is to be transferred.
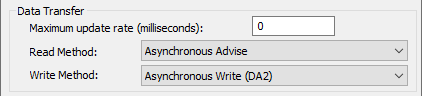
Maximum update rate (milliseconds) Enter the maximum rate you wish the data to be updated. This is useful for slowing down the rate of incoming data. The default is
0, which causes values to be updated as soon as possible. This value is also the polling time used by asynchronous and synchronous reads (see below).Load description and engineering unit properties This causes the DataHub instance to load any engineering unit and range information associated with each point. These values are then made available to all DataHub clients, and are displayed in the DataHub Data Browser. Activating this feature will increase the time needed for making the initial connection to the server.
Read Method Choose how to read data from the OPC server:
Asynchronous Advise The OPC server sends a configured point's data to the DataHub instance immediately whenever the point changes value. This is the most efficient option, and has the least latency.
Asynchronous Read The DataHub instance polls the OPC server for all configured points on a timed interval (set by the Maximum update rate). This option is less efficient than Asynchronous Advise, and has higher latency.
Synchronous Cache Read The DataHub instance polls the OPC server for all configured points on a timed interval (set by the Maximum update rate), and this thread waits for a reply. This option is less efficient than Asynchronous Advise or Read, and has higher latency than either of them.
Synchronous Device Read The DataHub instance polls the PLC or other hardware device connected to the OPC server for all configured points on a timed interval (set by the Maximum update rate), and this thread waits for a reply. This is the least efficient of all of these options, and has the highest latency.
Write Method Choose how to write data to the OPC server:
Asynchronous Write provides higher performance. The DataHub instance writes changes in point values to the OPC server without waiting for a response.
Synchronous Write elicits a quicker response from the OPC server, but results in lower overall performance. The DataHub instance writes changes in point values to the OPC server without waiting for a response. This option is useful if the OPC server doesn't support asynchronous writes at all, or if it can't handle a large number of them.
Depending on the OPC server you are configuring, you might have an option to use OPC DA 2.0 or 3.0. Please refer to the Data Transfer explanation in the OPC section of the Properties Window chapter for more information.
There are several optional entries:
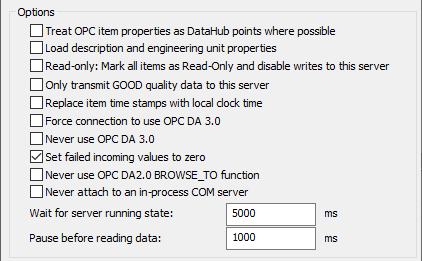
Treat OPC item properties as DataHub points lets you register and use non-standard OPC item properties as points in the DataHub instance. Generally you won't need this unless you plan to use the DataHub instance to distribute changes to values of the non-standard properties on your OPC items.
The DataHub instance will monitor these properties only if the OPC server exposes them as OPC items. If the properties do not show up when using this check-box, this means that the server does not expose the non-standard properties as items.
![[Important]](images/important_2051192373.png)
Some OPC DA servers are slow to register their OPC items and properties. Using this option with one of these servers can significantly slow the start-up time of the DataHub instance.
Read only: Mark all items as Read-Only lets you specify that the OPC server be read-only, regardless of how individual items are specified. Items in the DataHub instance that originate from such an OPC server will be read-only to all DataHub clients.
Replace item time stamps with local clock time allows you to set the timestamps for the items from this server to local clock time.
Force connection to use OPC DA 3.0 lets you choose the DA 3.0 write methods from the Write Method drop-down box. It will also instruct the DataHub instance to attempt to browse the server using DA 3.0 browsing. This setting will override any automatic information that the DataHub instance may determine about the server based on the server's registry entries.
Never use OPC DA 3.0 removes the DA 3.0 write methods from the Write Method drop-down box, and will instruct the DataHub instance to only use DA 2.0 browsing. This setting will override any automatic information that the DataHub instance may determine about the server based on the server's registry entries.
For more information about OPC DA 2.0 and 3.0, please refer to the Data Transfer explanation in the OPC section of the Properties Window chapter.
Set failed incoming values to zero The OPC DA spec requires an OPC DA server to send an
EMPTY(zero) value whenever it sends a failure code in response to an item change or a read request. Some OPC servers, however, send a valid value with the failure code under certain circumstances. To ignore any such value from the OPC server and assumeEMPTY, keep this box checked (the default). If instead you want to use the value supplied by your OPC server, uncheck this box.Unchecking this box will make the DataHub instance's behavior non-compliant with the OPC specification.
Never use OPC DA 2.0 BROWSE_TO function disallows the
BROWSE_TOfunction when communicating with OPC DA 2 servers. Sometimes an OPC server will have problems with this function that prevent the DataHub instance from connecting to it. Checking this box might allow the connection to be established in those cases.Never attach to an in-process COM server Most vendors include both an in-process and out-of-process COM server with their OPC DA server installation. If both options are available, the DataHub instance connects to the in-process server, as it is generally the better choice. This option forces the DataHub instance to consider only out-of-process servers.
Why is this useful? An in-process server is implemented as a DLL that is loaded into the client's address space. This makes the client very dependent on the good implementation of the server. If there is a crash in an in-process server, the client also crashes. An out-of-process server is implemented as a separate executable. The client communicates with an out-of-process server using the inter-process communication mechanisms in DCOM. In theory an in-process server will be faster than an out-of-process server, but sometimes the in-process server is less robust than the out-of-process server and leads to instability or malfunction in the client.
The
VT_EMPTYcanonical type may be incompatible for a particular combination of OPC server and client. For example, some clients or servers that were built before 64-bit integers were common may fail when presented with a 64-bit number. These options ( and ) allow you to enable or disable theVT_EMPTYcanonical type, either for trouble-shooting or as a permanent part of your configuration.See above.
Wait for server running state Every OPC DA server takes a little time to initialize before it will allow client connections. This option lets the user specify the time to wait for the OPC server to initialize. The wait time is a maximum; if a server initializes before this time, the DataHub instance will connect right away. If the server doesn't initialize within this time, the DataHub instance will report this in the Event Log, and then try to connect anyway.
Pause before reading data specifies a time for the DataHub instance to pause before reading the OPC server's data set. Some OPC DA servers report that they are running, but have not yet received the full data set from the process. If the DataHub instance attempts to connect right away, it might get a partial data set. The pause is fixed; it will always last for the full time specified.
The two above times are added together. The DataHub instance will wait until the server is initialized (or until the specified "wait" period is complete) and then pause for the specified "pause" time, before trying to read data from the server. For example, with the defaults of
5000and1000, at least 1 second and at most 6 seconds will elapse before the DataHub instance tries to read the data set.
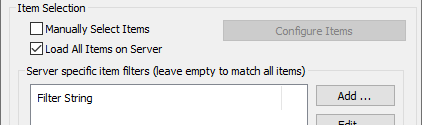
Finally, you can specify how the OPC items get selected. You can select them manually or load all of them.
- Manually Select Items
Check the box and press the button to open the OPC Item Selection window, where you can specify exactly which points you wish to use:
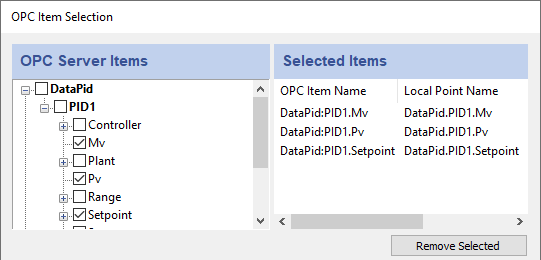
You can browse through the tree in the left pane, selecting points as you go. The selections will appear in the right pane. Follow these guidelines for making selections:
To select a server item from the right-hand pane, click its check-box.
To highlight a list of consecutive server items, click the first item, hold down the Shift key, and then click the last item. To highlight separate server items, hold down the Ctrl key as you click each item. To select a group of highlighted items, use the Spacebar.
These may not function as described for Windows NT or Windows 2000 operating systems.
Selecting a server item does not automatically add any of its child items. Each child item must be added separately. To view child items, click the
+sign in front of the item. If an item has one or more children that have been selected, the item name(s) will appear in bold.To delete selected items from the right-hand pane, highlight them and press the button. Use the Shift and Ctrl keys as above to highlight groups of selected items.
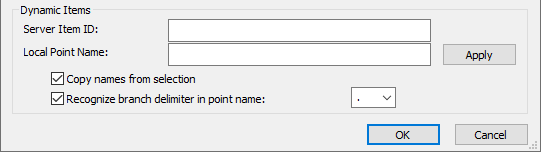
You may also configure dynamic items on the server. As you type in the Server Item ID, the system will fill in an identical DataHub Point Name for you (which you can change at any time). Press the Enter key or the button to create the item. Checking the box will fill in the entry with the name you select from the Selected Items list (above). The option lets you select and apply a point delimiter for your dynamic items.
- Load All Items on Server
In addition to manually loading items, you have the option in the Define OPC Server dialog to register all points, or filter for groups of points, from the OPC server.
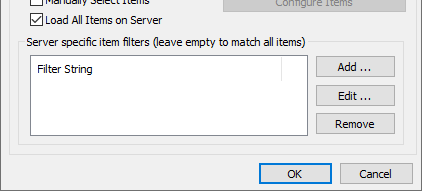
In the Server specific item filters you have the option create filters to select partial data sets. If you don't enter anything here, the DataHub instance will query the OPC server for all of its items and register them. The filters are all applied on a logical 'OR' basis, i.e. if a point satisfies the condition of any filter, it gets registered with the DataHub instance.
Click the button to add a filter. The Edit a filter string window will appear:

Enter a string or a pattern to match one or more item names in the OPC server. Each server has its own syntax for pattern matching, so you may have to experiment a little to get exactly the points you need. Commonly, the symbol
*matches any number of characters, while the symbol?often matches a single character. In that case, an entry of?a*would bring in all items withaas the second letter in their names.Click the button to open the Edit a filter string window and edit an existing filter. You can do the same thing by double-clicking a filter string in the list.
Click the button to remove a selected filter from the list.
Click the button in the Properties Window. The DataHub instance should begin to act as a client to the OPC server. Messages will appear in the Status column indicating the status of the connection:
Configuring After you click the button in the Define OPC Server dialog until you click the button in the Properties window.
Server Lookup The DataHub instance is looking for the OPC server.
Server Attach The DataHub instance has found the OPC server and is connecting. It may be waiting for the server running state, as explained previously.
Pause
NNNNms The DataHub instance is paused before reading data, as explained previously.Running The DataHub instance is connected to the OPC server and exchanging data.
Disconnected The DataHub instance has disconnected from the OPC server.
You can verify the connection using the Data Browser or the Connection Viewer. You can change server settings at any time. The DataHub instance will reconnect and apply the changes when you click the button in the Properties Window.
Configure the DataHub instance as tunnelling master
The tunnelling master DataHub instance receives the initial request from a tunnelling slave to establish the tunnelling connection, initially or after a network break. For this reason we suggest that for any two tunnelling DataHub instances, the master be on the OPC server machine. Once the connection is established the two DataHub instances are indistinguishable from each other; both will send and receive data changes.
Right click on the DataHub system-tray icon and choose .
In the Properties window, select Tunnel/Mirror.

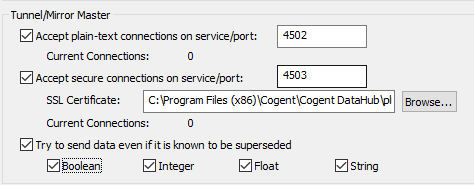
In the Tunnelling Master section, you can configure plain-text or secure tunnelling. Ensure that at least one of these is checked. If you want to change any of the other defaults, please refer to Tunnel/Mirror in the Properties Window chapter for more information.
To optimize throughput, un-check the Try to send data even if it is known to be superseded option. This will allow the DataHub instance to drop stale values for points which have already changed before the client has been notified of the original change. The latest value will always be transmitted.
To support incoming WebSocket connections from DataHub tunnelling clients, you will need to configure the tunnelling master DataHub instance's Web Server. For WebSocket connections, we recommend using SSL, on port 443.
Click to close the Properties window.
The server machine side of the tunnelling connection is now ready, and you can move to the client machine. See also Tunnelling Security - Best Practices.