3.12. MQTT Client

|
The MQTT Client option lets you configure the DataHub program as an MQTT client to any number of MQTT brokers, with pre-configured connections for Azure IoT Hub, Google IoT, and AWS IoT Core. The DataHub program implements bi-directional data transfer between the MQTT broker and standard industrial protocols. It provides some configurability of the MQTT message format, allowing you to convert directly between MQTT messages and data points. In effect the DataHub program can act as an industrial MQTT gateway.
|
3.12.1. Make the Connection
MQTT Client Connections
The DataHub program can act as a client to one or more MQTT brokers.
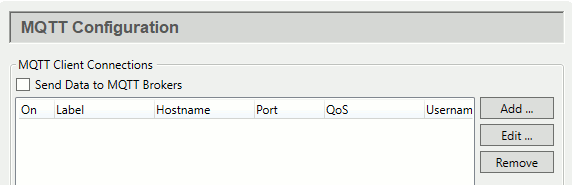
Check the box to enable MQTT client functionality. Since a DataHub instance can be a client to more than one MQTT broker, you need to specify broker information for each MQTT client connection. Once you have a broker listed, you can activate or deactivate the connection using its On check box.
To add a broker, press the button to open the Connect to MQTT Broker window described below. To edit a broker connection, double-click it or select it and press the button to open that window. To remove a broker, highlight it and click the button.
The Connect to MQTT Broker window
To define or edit an MQTT broker connection, click the or button to open the Connect to MQTT Broker window:

Here you have four initial options: configure a standard MQTT connection, or choose one of Azure IoT Hub, Google IoT, or AWS IoT Core. Each of these three broker-specific tabs provides entry fields unique to that connection which assist in filling in the configuration explained below.
Connection
To configure a standard MQTT connection, click the Standard MQTT tab and enter the following information:
- Label
A name used by the DataHub instance to identify the connection. There should be no spaces in the name. It doesn't matter what name is chosen, but it should be unique to other connection names.
- Host Name/IP
The name or IP address of the computer running the MQTT broker you want to connect to.
- Port
The number of the open port on the MQTT broker that will receive your connection request. The default,
1883, is the port typically used for MQTT.- Keepalive
The number of seconds between MQTT keepalive messages, which are transmitted between the broker and client to help them detect a network failure or lost connection. The default is
30. Lower numbers will detect network failures more quickly, but will also slightly increase message traffic and may result in false failure detections on slow networks.- Retry rate
The number of milliseconds to wait before retrying a failed connection.
- Maximum update rate
A limit on how often the DataHub instance sends packets to the MQTT broker. The default,
0, sets no limit. Setting this to a positive number will cause the DataHub client to accumulate those changes for that number of milliseconds, and then attempt to send them all at once. If the receiving application does not expect batched messages then there is no advantage to setting this option. Please see Broker Limits for more information.![[Note]](images/note_1156523861.png)
This can be useful when sending JSON messages (see below) that contain multiple point names and values, for better efficiency.
Authentication
Enter your MQTT broker authentication information, as applicable.

- Use SSL
MQTT over SSL requires the broker to have a server certificate, either self-signed or certified by an official certificate authority (CA). Checking the Accept invalid certificates box will allow the DataHub MQTT client to establish an SSL connection to the broker if the server certificate is invalid or self-signed. Otherwise the broker's certificate must be issued by a recognized and trusted CA.
In addition, the DataHub MQTT client can optionally provide a client certificate that the broker will use to identify and authenticate the connection. If the client certificate is password-protected, you must also supply the client certificate password. For authentication you may provide a client certificate, a username/password pair, or both, depending on the broker's requirements.
- Client ID
An ID that the broker is expecting for this MQTT connection.
- Username
The user name for this ID.
- Password
The password for this username.
Message Content
MQTT does not have a set format for message content; different MQTT brokers often require different formats. You need to know the format used by the broker you are connecting to.

Configuring message formats is explained below. For message formats, please see MQTT Advanced Parser in Using MQTT.
- Message format
The option lets you edit the format of your message to match to the format of the broker you are connecting to. Click the button to open the Configure Parser window:

The JSON Path fields at the top show your current entry. To make changes, edit the Message Start, Per-Point Format, Per-Point Separator, and the Message End fields. When you press the button your changes will be registered. To make a new entry, such as
"PointName", enter a string and the placeholder (like{point}in this example) using the same syntax as the other entries in the Per-Point Format entry field.The simplest way to pass an MQTT message is with unparsed values. To configure this in the DataHub instance, the Per-Point Format must be simply:
{value}with no entries in the other fields.
The default Per-Point Format can be used for single DataHub points:
{ "Value": {value}, "Quality": {quality},
"Timestamp": {jsontimestamp}, "SenderId": {sender} }
with no entries in the other fields.
To collect the data from multiple points and send it as a single message, you can do the following:
In the Connection settings, change the Maximum update rate to a non-zero number to allow the DataHub instance to batch values by time.
In the Push data point to the MQTT broker settings, check the box Send all messages to this topic:, and enter a topic name.
In the Message Content, Message format settings, use open and closed square brackets (
[and]) for the Message Start and Message End entries, and a comma (,) for the Per-Point Separator. Then make the following entry for the Per-Point Format:{ "TopicName": {topic} "PointValue": {value}, "PointQuality": {quality}, "PointUnixTimestamp": {unixtimestamp}, "SenderId": {sender} }
White space does not matter.
The order of the properties does not matter.
Capitalization in property names does matter.
If topics are encoded in each element of the array (as above), the destination topic to which the client sends this message does not matter. The destination topic must still be well-formed, it just will not get written to.
These settings will tell the DataHub instance to collect values for the amount of time specified in the Maximum update rate, and will send all point values as a batch to the specified topic.
When pulling data from the broker, the broker's payload format may not map directly to DataHub points. Please see Message Payload Formats for information on how to handle this case.
- Quality of service
MQTT supports 3 levels of quality of service.

At Most Once (0) Every message will be delivered on a best-effort basis, similar to UDP. If the message is lost in transit for whatever reason, it is abandoned―the receiver never receives it, and the sender does not know that it was lost.
At Least Once (1) Every message will be delivered to a receiver, though sometimes the same message will be delivered two or more times. The receiver may be able to distinguish the duplicates, but perhaps not. The sender is not aware that the receiver received multiple copies of the message.
Exactly Once (2) Every message will be delivered exactly once to the receiver, and the sender will be aware that it was received. Some MQTT brokers and services, such as Azure IoT Hub, Google IoT, and AWS IoT Core do not support this quality of service, and will simply disconnect when you attempt to send a topic update.
If you are not sure, choose Exactly Once (2), the default.
- Retain messages on broker
Normally an MQTT message that has no subscribers is simply discarded by the broker. This option tells the broker to keep the last message on this topic even if there are no subscribers.
Last Will Message
The Last Will and Testament (LWT) feature of MQTT automatically generates a message to all other clients if a client fails unexpectedly. Here you can configure that message, as well as messages for normal startup and shutdown.

- Topic
The MQTT topic for the message. Leaving this blank will disable the sending of any message.
- Quality of service
Choose the MQTT quality of service. Please refer to Quality of service (above) for more information.
- Value when starting
The message you want this client to send on start-up.
- Value when stopping
The message you want this client to send on normal shut-down.
- Value when connection lost
The message you want this client to send on any kind of unexpected shut-down or disconnect.
Forwarding
The Forwarding feature of MQTT lets you access data collected in an external historian and forward it to an MQTT broker. Currently only InfluxDB is supported.

- Enable forwarding from a historian
The checkbox activates data forwarding. When data forwarding is active, the MQTT client connection will disable transmission of live data. This is done to ensure that data values are not transmitted multiple times, once from the historian and once from the live data set, and avoids the out-of-order transmission that would otherwise occur.
- Forwarding strategy (source)
Select the label for the configured InfluxDB database containing the data that you want to forward.
- My unique forwarding ID
A string that uniquely identifies this connection as a forwarder. Each connection that acts as a forwarder from a specific database must be uniquely distinguished from all others. The forwarding mechanism uses this ID to keep track of which values have been transmitted to each forwarder. You may enter any string, or keep the automatically generated ID.
- Override read location
Sets the specified row ID or date as the starting point for reads from the historian.
Sampling
The Sampling feature lets you send samples of the data for specified time intervals, rather than the full data set.

- Enable data sampling
Activates the data sampling feature.
- Sampling interval (ms)
The length of time for which each sample will be taken, in milliseconds. For example, a sample interval of
1000will produce a sample every second. Choosing this option will result in zero or more values being sent to the server based on the presence of data changes and the Sampling type.- Sampling type
Choose the criteria for the sample. This setting determines which values will be transmitted for each sampling interval. If there is no data (or no Good quality data) for a point within a sampling interval then no value will be transmitted. The following criteria are available:
None - no sampling is done and all values are transmitted. First - the first value in the sampling interval is transmitted. Last - the last value in the sampling interval is transmitted. Mean - the average of all (good) values in sampling interval are transmitted. Min - the minimum value within the sampling interval is transmitted. Max - the maximum value of the sampling interval is transmitted. MinMax - the minimum and maximum values of the sampling interval are transmitted, in time order. - Ignore bad quality data
If the data quality for that time interval is not Good then that data change will be ignored. Other samples within the time interval that have Good quality will still be processed normally.
- Sort data by timestamp
Sorts the sampled values in time order when constructing the message body using the document definition. Since sampling is done on a per-point basis, the resulting collection of values may not be in time order. For example, the maximum value of
point2might have occurred before the maximum value ofpoint1. This option sorts the resulting combined set of values.- Snapshot by accumulation time
Specifies that a complete snapshot of all configured data points will be periodically sent as a batch to the broker. Please refer to the Maximum update rate in the Connection settings configuration. The snapshot period will be this update rate, not the sampling interval. Each data point will be transmitted with its source timestamp and current value.
- Set snapshot times to system time
When saving data using a snapshot, replace the source timestamp of every point value with the current system time. This applies to all points, whether or not they have changed within this accumulation interval.
| |
Once you have configured the Connection, Authentication, Message
Content, Last Will Message, Forwarding, and Sampling options, we
recommend testing the connection by clicking the
button. This will close the
Connect to MQTT Broker dialog and display your
entries in the list of configured brokers. The
Status should eventually change to
|
When the connection is tested and working, you are ready to exchange data.