13.2. Making MQTT Client Connections
The DataHub MQTT Client option lets you connect with virtually any MQTT broker, to publish or subscribe to any or all topics. If you are using Azure IoT Hub, Google IoT, or AWS IoT Core, please see those sections for configuring client connections. To connect to any other MQTT broker, here is what you need to do.
![[Note]](images/note_1156523861.png) | |
To keep things simple, if you plan to run an MQTT broker on your local machine, ensure that the DataHub MQTT Broker is not also running. You can disable it by unchecking the box in the MQTT Broker configuration. |
Subscribe (get topics)
Before pushing any data to the MQTT broker, it can be useful to know some or all of its topics. This procedure shows how to register a DataHub instance with an MQTT broker and bring its topics into the DataHub MQTT client and the DataHub data set.
In the DataHub Properties window, select MQTT Client.

Click the button to open the Connect to MQTT Broker window.
In the Standard MQTT tab, for the Connection enter the following:

Label: Enter any text string.
Host: Enter the name or IP address of the host of the broker.
Port:
1883(the default)Keepalive:
30(the default)Retry rate:
5000(the default)Maximum update rate:
0(the default).
In the Message Content tab ...

press the button to open the Configure Parser window:

In the Per-Point Format field enter just the string:
{value}.
Delete any entries in the Message Start, Per-Point Separator, and Message End fields.
Click . Your Message format should now look like this:

For information on the other tabs here, please see Authentication, Last Will Message, Forwarding, and Sampling in the MQTT Client section of the Properties Window chapter.
Choose Pull topics from the MQTT Broker.

Click the button and enter the hash symbol (
#), which tells the broker that you want to subscribe to all topics.Check the Place all data points into this data domain box, and enter
MQTTClientin the entry field.
This keeps all of your MQTTClient points separate from other DataHub data.
Click and then to save your settings.
Open the DataHub Data Browser. You should now see all of the topics from the MQTT Broker in the MQTTClient domain.

| |
If the broker's payload format does not map directly to DataHub points, you may wish to change it. Please see Message Payload Formats for more details. |
Subscribe (push data)
This procedure shows how to push data from DataPid to your MQTT broker.
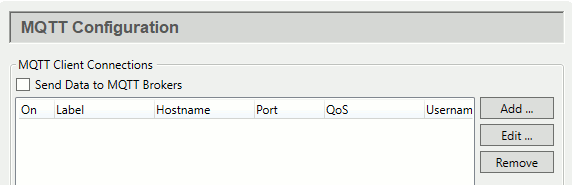
In the Properties window, select MQTT Client.
Click the button to open the Connect to MQTT Broker window:

In the Standard MQTT section, Connection tab, enter the following:
Label: Enter any text string.
Host: Enter the name or IP address of the host of the broker.
Port:
1883(the default)Keepalive:
30(the default)Retry rate:
5000(the default)Maximum update rate:
0(the default).
In Authentication, enter the Username and Password for the MQTT broker, if applicable.
This example uses the DataHub program's default JSON message content format. If you want to use a different format to send data to a broker, please refer to the client Message Content documentation for how to change it. If you want to simply send the unparsed values, please refer to the Unparsed Values documentation.
For information on the other tabs here, please see Message Content, Last Will Message, Forwarding, and Sampling in the MQTT Client section of the Properties Window chapter.
In the Push data points to the MQTT broker section, Available Points list, open the DataPid tree and select the point
Pv. (If you don't see theDataPiddomain, start DataPid.)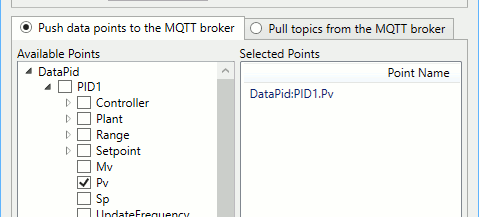
Click , and then .
In the MQTT broker or a connected MQTT client, you should see the values for DataPid:PID1.Pv updating. These messages are using the DataHub program's default message content format.

You have now configured the DataHub MQTT Client to push a value to an MQTT Broker. For more information about the MQTT Client feature, please refer to Section 3.12, “MQTT Client”.
Subscribe (pull data)
With data from DataPid being pushed to your MQTT broker, you can now create an MQTT client connection to pull that topic and its data from the broker.
| |
If you have not yet completed the previous procedure, please do it now for best results here. |
In the Properties window, select MQTT Client.
Click the button to open the Connect to MQTT Broker window:

In the Standard MQTT section, Connection tab, enter the following:
Label: Enter any text string, different from any previous label.
Host: Enter the name or IP address of the host of the broker.
Port:
1883(the default)Keepalive:
30(the default)Retry rate:
5000(the default)Maximum update rate:
0(the default)
These settings assume that the broker is using the DataHub program's default JSON message content format. If your broker is using a different format, please refer to the Message Content documentation for how to change it. If you want to simply receive unparsed values from the broker, please refer to the Unparsed Values documentation.
For information on the other tabs here, please see Authentication, Message Content, Last Will Message, Forwarding, and Sampling in the MQTT Client section of the Properties Window chapter.
In the Pull topics from the MQTT broker section, click the button and enter
DataPid/PID1/Pv.
Click the button and enter a domain name, such as
MQTTPullTest.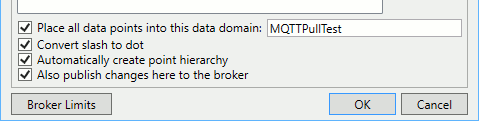
Click , and then .
In the Data Browser, you should see the values for DataPid:PID1.Pv updating, as normal DataHub point values.

You have now configured the DataHub MQTT Client for a topic to pull values from an MQTT broker. For more information about the MQTT Client feature, please refer to Section 3.12, “MQTT Client”.
Message Payload Formats
Messages for or from an MQTT broker might not have a payload format that maps
directly to DataHub points. Data points in the DataHub program are 4-element tuples of the
form (name, value, quality,
timestamp). Those are the only elements that can be extracted
from the information being sent to or arriving in an MQTT payload for the DataHub
instance. In the JSON format, these rules will be applied:
Only one of
topicorpointwill be used.Only one
timestampwill be used.Only one of
qualityorqualitynamewill be used.
If the payload format is the same for each item, and if elements of the payload represent quantities that should be placed in a DataHub point, then it is possible to create a simple parsing template. For example, if you have a payload like this:
{ "PT": "MyPoint", "VAL": 33, "TS": 1548276263.866, "QTY": 192, ... }As long as the elements correspond to name, value, timestamp and quality then a possible template could be constructed like this:
{"PT": {point}, "VAL": {value}, "TS": {jsontimestamp},
 "QTY": {quality}}
Where the value of "PT" is the point name, the value of
"VAL" is the point value, the value of
"TS" is a Unix, ISO, or JSON timestamp, and the value of
"QTY" is the point quality. Other placeholders are available
to use in the template, as provided in the editor.
If the payload represents multiple points with a common JSON format such as this array of points:
[ { "PT": "MyPoint", "VAL": 33, "TS": 1548276.866, "QTY": 192, ... },
  { "PT": "MyPoint2", "VAL": 66, "TS": 1574462.566, "QTY": 192, ... },
  { ... }, ...]
Then, in the editor, the Message Start field would hold an
open array bracket ( [ ), the Per-Point
Separator field would be a comma ( , ), and the
Message End field would hold a closed array bracket (
] ). The Per-Point Format field would
hold the common parser template string such as above with appropriate placeholders.
This would associate the values coming from the MQTT broker with properties of DataHub
points, populating each point with meaningful content that could then be used by
connected DataHub clients.
If you have a more complex JSON payload, or if the format of the payload differs
from item to item, then it may be necessary to use the Advanced Parser. This allows you to input
a raw JSON payload string obtained from using the per-point format set to
{value}, and use it to generate a matching schema that can be
adjusted as needed.