14.2. Remote Connections
To meet increased security requirements, anonymous remote (networked) connections in DataHub version 11 and above are not assigned data access roles by default. This applies to the following Internal users:
Mirror - for tunnel slave connections
MQTT - for MQTT client connections
OPCUA - for OPC UA client connections
TCP - for TCP connections, such as when using the DataHub Add-in for Microsoft Excel or the DataHub APIs.
The default roles for local connections are BasicConnectivity and AllDataFullAccess, while remote connections are given only BasicConnectivity. These default settings protect system data from unauthorized remote users, while giving full access to local anonymous connections.
To enable remote data access, the recommended way is to add a new user for each protocol you need, one that has both BasicConnectivity and AllDataFullAccess roles. When doing so, you should uncheck the RequireTOTPAuthenticaion role for that user, since the user is non-interactive and cannot use two-factor authentication. With this new user defined you can make remote slave or client connections by entering its username and password credentials when configuring the connection.
Alternatively, you can allow anonymous access by modifying the remote IP address principal of the internal Mirror, MQTT, OPCUA or TCP user so that it has BasicConnectivity and AllDataFullAccess roles. This is not best practice because it bypasses security. To access the internal users, choose Internal from the Organization: dropdown in the top left corner of the security window.
In either case, it is possible to further restrict access by IP address, interface protocol and data domain. Again, the recommended approach is to create a new user, rather than modify an internal user.
Example
Here is an example for how to add a built-in user essential permissions for remote connections:
In the DataHub Properties window, select the option and click the button.
Set the Organization to , and in the Users tab, under Users, click the button and select .

Enter a User Name such as
NetworkUserwith a password likeEfgh5678. Uncheck the box because this will be an automatic, non-interactive connection.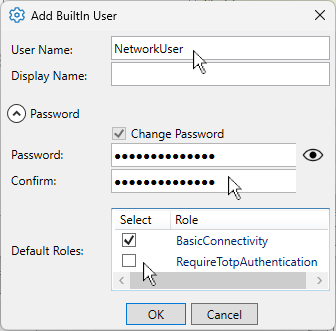
Click the button. The username NetworkUser will appear in the Users list, as well as in the Principals list.
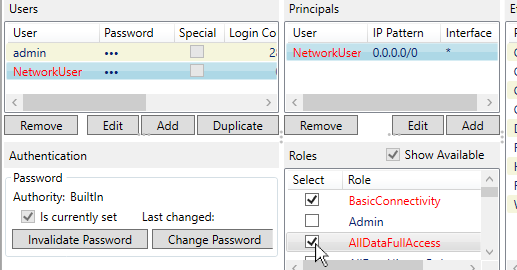
Check the box to provide read and write permissions on the data. If you do not see that option, check the Show Available box.
Click to apply the changes.
Now any remote user that logs in with the NetworkUser username
and password will be able to connect and access data for reading and writing. To
enhance this essential security by restricting access based on a communication
protocol, IP address pattern, or DataHub data domain, please see Restricting Access.