16.9. Regular Expressions
In previous sections we added some variables, with corresponding states and scripts. Instead of assigning single values to all of the variables, we can use regular expressions for some of them, to allow alarms to be generated from multiple points with similar names.
![[Note]](images/note_1156523861.png) | |
Regular expressions are a way that programmers use place-holders and wild cards in a variable name so that it can refer to multiple names at one time. The DataHub program uses .NET Regular Expressions, whose use and syntax can be found here. |
Go to the Variable Bindings tab and click the button. This will add a new binding definition to the Binding Definitions list, and show you the first variable (
input).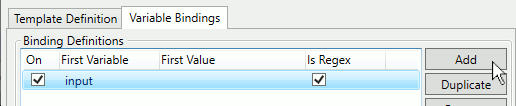
The first variable is used to create regular expressions for the binding definition. Any additional variables in the binding definition can access matches within the regular expressions for the first variable.
Check the box.
In the Variable Bindings enter the following for the input variable:

DataPid(.*):PID1\.(.p|.v)$
This regular expression selects any point with the following characteristics:
DataPid(.*):chooses any data domain that starts withDataPidPID1\.chooses thePID1.branch.(.p|.v)selects any single letter, followed byporv. In this case, it will selectSp,Mv, orPv.$ends the expression.
For the output variable enter:

default:PID{0}.{1}AlarmThe numbers within the curly brackets
{ }will bring in whatever value corresponds within the parentheses( )in theinputvariable, in order. That is, the0matches the content of the first set of parentheses, the1matches the content of the second set, and so on.For the rest of the variables, the limits, you can enter constant values.

For example,
70and60for thehihilimitandhilimit, and40and30for thelolimitandlololimit.In the Regex Explorer section you can test your regular expression.
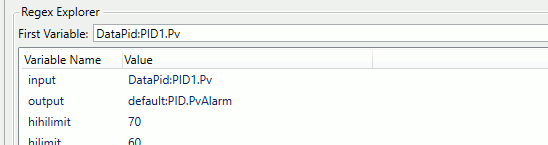
Enter a point name that you think matches the regular expression, such as
DataPid:PID1.Pvin the First Variable field. If your regular expression is correct, you should see how that entry will appear for all of the related variables.
This completes the OPC A&E example. To test:
Click the button to return to the Notification Configuration window.,
Check the and boxes and click .
Start DataPid.
In the Data Browser, open the OPCAE tree and click on Status.

You should see the values of the
*HighLowTestpoints changing betweenHiHi,Hi,LoLo,Lo, andNormal.If you have installed the DataHub OPC A&E plug-in, you can view these alarms with any OPC A&E client application.
| |
It is also possible to view OPC A&E alarm data in DataHub WebView's Alarm List control. |