14.7. Using a DMZ
To maximize security for both the sender and receiver, you can use a DMZ to keep firewalls on both sides closed.

On the DMZ computer
The DataHub instance on the DMZ both receives and sends data. Data comes in via a Tunnel (Push) connection from the sending side DataHub instance. Data goes out via a Tunnel (Pull) connection from the receiving side.
To receive these inbound connections, you need to ensure that this DataHub instance's Tunnel/Mirror Master is enabled. This time we will use port
4504for the plain-text Tunnel(Push) connection coming from the sending side to keep it separate from our previous example, and port4506for the SSL Tunnel(Pull) connection coming from the receiving side.
You will need to configure an InfluxDB database with this DataHub instance's External Historian for receiving, storing and forwarding data. Here's what you need to do:
In the External Historian option
 click the
button.
click the
button.Select , label this historian connection
InfluxDMZand configure a new, local database namedDataHubDMZ.
As mentioned previously, if you don't have a user name or password for InfluxDB, you can leave those fields blank. If you have previously installed InfluxDB independently of the DataHub program installation, then you'll need to use your existing InfluxDB URL.
In Forwarding Strategies, click the button and configure a Transfer named
FwdFromDMZand choose theInfluxDMZhistorian that you just created.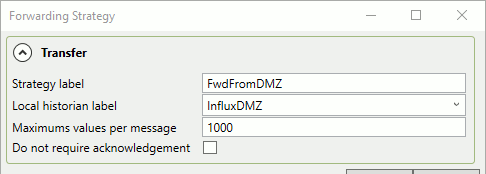
When finished, click and . This forwarding strategy will be used by the Tunnel(Pull) connection from the receiving side.
On the Sending Side
The sending side DataHub instance is configured for a Tunnel (Push) connection, but with a new tunnel and sending to the DMZ historian.
Create a new Tunnel Slave connection that uses the name or IP address of the DMZ computer. Label this connection
TUN002, use port4504to match the DMZ DataHub instance, and leave SSL unselected.
Create a new External Historian Tunnel(Push) connection.
In Write data to Historians click the button and choose . Configure it as follows:

The Label can be
PushToDMZ.For the Tunnel connection name select
TUN002.The Remote historian label should be
InfluxDMZ
For the Forwarding strategy, you can continue using
FwdByTunnelas configured previously:
When finished, click and .
On the Receiving Side
Configure this DataHub instance as you did for Tunnel (Pull) On the Receiving Side, but this time for the DataHub instance running on the DMZ.
Create a new Tunnel Slave connection that uses the name or IP address of the DMZ computer. Label this connection
TUN003, use port4506to match the DMZ DataHub instance, and check the SSL option.
Create a new External Historian Tunnel(Pull) connection.
In Write data to Historians click the button and choose . Configure it as follows:

The Label can be
PullFromDMZ.For the Tunnel connection name select
TUN003.For the Local historian label select
Influx3
For the Remote System options, you should set the Remote forwarding strategy to
FwdFromDMZ
When finished, click and .
Data from the sending side DataHub instance should now be flowing to the DataHub instance on the DMZ, and from there onwards to the receiving side DataHub instance. You can verify this in the respective Event Logs and/or Chronograf, as explained in the Connectingsection.