6.3. File Transfers
With the File Transfer control, you can transfer files to and from remote services.
This control supports file transfers between the local computer where the WebView page is displayed, and either of these two options:
The DataHub instance running the WebView application.
Any connected Varec Remote Terminal Unit (RTU).
6.3.1. Using the Control
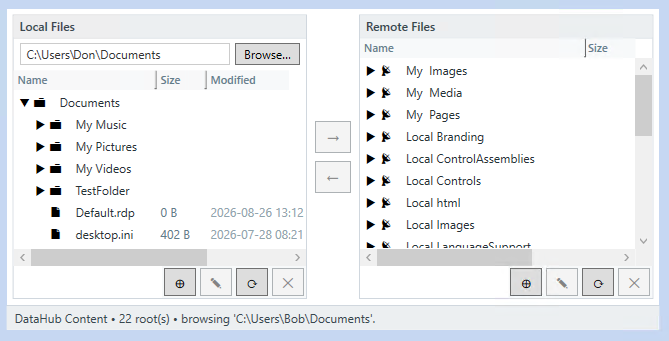
- Local Files
These are the files available on the local computer where the WebView window is being displayed. The default directory is the Windows Documents folder. If the button is visible, you can change the local directory, by browsing or by typing in a folder path. If that button is hidden, only the default folder and its subfolders can be entered.
- Remote Files
The folders and files available on the remote service. See File Locations for DataHub Content.
- Selecting folders
Click the arrow beside a folder to show its contents. A Loading... message may appear while the contents are being found.
- Selecting items
Select a file or folder by clicking its row.
To select several separate items, hold while clicking each item.
To select a group of nearby items, select the first item, then hold and select the last item.
Click an item without holding or to start a new selection.
Local and remote selections are separate. Selected rows are highlighted.
- Uploading files
Use the right arrow to copy files from your computer to the remote location, keeping the original files on your computer.
In Local Files, select the files or folders you want to upload.
In Remote Files, select the destination folder or remote location.
Select the right arrow between the two lists.
Watch the message and progress bar at the bottom.
If you select more than one remote destination, each selected local file is uploaded to every destination.
You can also drag local items onto a remote folder. Files and folders can be dragged directly from Windows File Explorer onto a remote folder as well.
- Downloading files
Use the left arrow to copy files from a remote location to your computer, keeping the original remote files in place.
In Remote Files, select the files or folders you want to download.
Choose the local destination:
Select exactly one local folder to download into that folder.
If no folder or more than one folder is selected, the folder shown in the path box is used.
Selecting a local file does not make it the destination.
Select the left arrow between the two lists.
Watch the message and progress bar at the bottom.
You can also drag remote items onto a local folder.
Managing Folders and Files
![[Important]](images/important_2051192373.png) | |
When you transfer a folder, the control includes the files inside that folder and its subfolders. It does not recreate the original folder structure at the destination. All transferred files are placed together in the chosen destination folder. Because files from subfolders are placed together, different files can have the same destination name. By default, the control warns before an upload or download that could replace a same-named file. If you choose to continue, a later same-named file can replace one transferred earlier. The page designer can turn these confirmation prompts off. |
![[Note]](images/note_1156523861.png) | |
Empty folders are not transferred. |
- Create a folder
Select the location where the folder should be created.
Select the plus button.

Enter the folder name.
Click .
If a file is selected, the new folder is created beside that file. Some remote services do not support creating folders.
- Rename an item
Select one file or folder.
Select the pencil button.

Enter the new name.
Click .
Remote top-level locations cannot be renamed. Some remote services do not support renaming.
If local folders are not limited, the top-level folder shown under Local Files can be renamed. This may leave the path box showing its old name, so use the button to choose the renamed folder again. When local folders are limited, the configured default folder cannot be renamed.
- Refresh a list
Select the circular arrow button to update the list.

Use if a recent change is not shown. Refreshing clears the current selections.
- Delete items
Select the files or folders you want to delete.
Select the X button below the same list.

By default, a confirmation message appears before deletion. If the page designer has turned confirmation off, deletion begins immediately. Deleting a folder deletes everything inside it.
The top-level folder shown under Local Files can be deleted when local folders are not limited. When local folders are limited, the configured default folder is protected. Remote top-level locations cannot be deleted.
- Cancelling an operation
During a transfer or another long operation, a progress bar and button appear at the bottom. Select to stop the current sequence. Any files that were transferred before cancellation remain at the destination. Work that has already started on a remote device may continue to completion.
Messages and problems
The message bar at the bottom explains what the control is doing. A red message reports a problem or an action that needs attention. Common situations include:
| Message or situation | What to do |
|---|---|
| Folder is empty or not found | Check the local folder path, or choose another folder with |
| No remote files | Check that the DataHub instance is connected and that you have access to a remote location. Contact your system administrator if the problem continues. |
| A transfer button is unavailable | Select the required files and destination. The action may also have been disabled when the control was set up. |
| A create, rename, or delete action fails | The remote service or your user account may not allow that action. Contact your system administrator. |
| An operation times out | Check the connection and try again. |
| A file or folder is missing after a change | Select the Refresh button for that list. |