Chapter 2. Reference
2.1. Connection
These are the required and optional parameters for making a connection to a DataHub instance or DataHub for Azure.
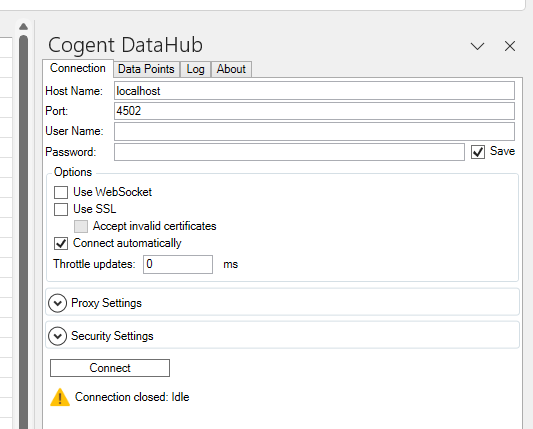
- Host Name
The name or IP address of the host computer for the DataHub instance, or the IP address for DataHub for Azure.
- Port
The port number on the host computer or
443for DataHub for Azure accounts. Port80is standard for WebSocket connections, and443for SSL (see below).- User Name
The user name for the DataHub instance or DataHub for Azure.
- Password
The corresponding password. The Save button allows you to save the password with this worksheet.
Options
- Use WebSocket
This is required for connections to DataHub for Azure, and optional for a DataHub instance. It ensures that the connection is outbound-only from the DataHub Add-in. Port
80(see above) is standard for this option when used without SSL.- Use SSL
Provides the option of using SSL. Port
443(see above) is standard for this option, when used alone or with the WebSocket option, such as with DataHub for Azure.- Accept invalid certificates
Allows the SSL connection to be made even if the security certificate is invalid.
- Connect automatically
Causes the workbook to attempt a connection when it is opened.
- Throttle updates
Lets you control the rate (in milliseconds) at which updates come into Excel over this connection. This is helpful for reducing bandwith or system resource use. The default (
0) allows updates as fast as possible.
Proxy Settings
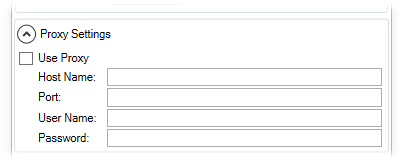
- Host Name
The name or IP address of the host computer for the proxy server.
- Port
The port number on the host computer for the proxy server.
- User Name
The user name required by the proxy server, if any.
- Password
The corresponding password.
Security Settings
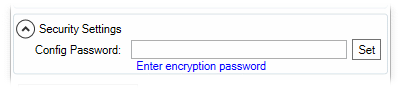
- Config Password
Entering a password here and saving the worksheet will encrypt the DataHub Add-in configuration stored within the worksheet. Once a password is set, any user opening the worksheet would need to open this configuration panel and enter the password to establish the data connection.
For all connections
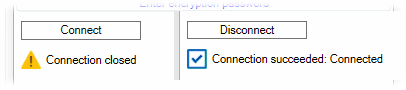
- Connect button
Sends a request for a connection (or disconnect) according to the current configuration.
- Status messages
Displays the status of the connection. These all get logged, and can be viewed in the Log tab.