Chapter 18. Excel Connections
You can use the Cogent DataHub program to put data into Excel, and to write data from Excel back to the DataHub program.

The following sections explain how to drag and drop live data into Excel, how to configure a DataHub instance to receive data, and how to use Excel macros for sending and receiving data between Excel and the DataHub instance.
![[Important]](images/important_2051192373.png) | |
Independently of the DataHub DDE feature, you can use DataHub Add-in to exchange data in real time with Excel—locally or over a network. |
18.1. Getting Data into Excel
Before starting, to see any results you will have to ensure that you have some kind of data being fed into a DataHub instance. If your system isn't set up for this yet, you can create a local data feed by following the steps outlined in Section 2.2, “Test with simulated data”.
There are two ways to get data into Excel from the DataHub instance: by setting up a DDEAdvise loop to receive data automatically, or by using a DDERequest command from a macro to read data. Deciding which to use depends on your situation. We suggest you become familiar with both. For more information about DDE and these commands, please refer to Section 20.3.2, “DDE Protocol” and Appendix 7, DDE Overview.
18.1.1. Method 1 - Drag and Drop using DDEAdvise
The easiest way to get data into Excel is to drag and drop point names from the DataHub Data Browser directly into the Excel spreadsheet. This automatically sets up a DDEAdvise loop between Excel and the DataHub instance. DDEAdvise loops update automatically so you will always see the latest data in your spreadsheet.
Right click on the DataHub system-tray icon and choose .
In the Properties window, select DDE.


Ensure that the box Act as a DDE server is checked, and that the name
datahubappears in the DDE Service Name area. If not, click the button and add the namedatahub.Click to close the Properties window.
Right click on the DataHub system-tray icon and choose from the pop-up menu to open the Data Browser.

Ensure that the Drag & Drop Style at the bottom of the Data Browser is set to MS-Office (Excel/Word).
Open an Excel worksheet.
In the Data Browser, click on the label for a point and drag it into the Excel worksheet.
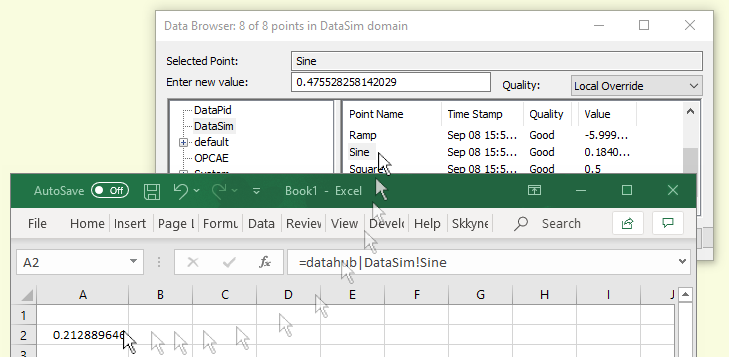
You should see the data update in the worksheet at the same rate it is updating in the DataHub instance.
![[Note]](images/note_1156523861.png)
You can select multiple points for drag and drop by using Shift-click or Ctrl-click.
You can drag and drop timestamps and other attributes of a point using the Property dropdown list. Please refer to Drag and Drop Style and Property in the Data Browser section for more details.
If your data displays but does not update, you might need to change your settings in Excel. Please refer to Section 18.5, “Basic Trouble-Shooting for Excel Connections” for more information.
| |
When you save and close a spreadsheet connected to a DataHub instance, and then attempt to reopen it, you may get one or more messages, depending on your security settings in Excel, or other circumstances. Here's a summary of each message, and what to do:
|
18.1.2. Method 2 - Excel Macros using DDERequest
Sometimes, you may prefer to manually read data into your spreadsheet, rather than use a DDEAdvise loop to constantly accept new values. It may be that you intend to print reports only a couple of times a day and don't need to see every point change in between. You can have Excel read specific data points from the DataHub instance; at your request by triggering the DDERequest command from within a macro.
Using DDERequest within a macro gives you complete control over when Excel reads new point values, and lets you read several data points at one time. To run the macro, it is convenient to link it to a control button. This is explained in Add a Control Button.
18.1.2.1. Create a macro
Open a spreadsheet.
From the menu, select , and then .
In the Macro Name: field of the Macro dialog box, type the name
GetInput, and press the button.In the Visual Basic text entry window that comes up, edit the macro to read as follows:
'
' GetInput Macro
'
Sub GetInput()
    mychannel = DDEInitiate("datahub", "default")
    Application.Worksheets("Sheet1").Activate
    newval = DDERequest(mychannel, "my_pointname")
    Sheet1.Cells(2, 3) = newval
    DDETerminate mychannel
End Sub
Use the name of your data point from the DataHub instance for
my_pointnameWe use cell
C2in this example. If you need to use another cell, you will have to replace(2, 3)with the row and column numbers of the cell you wish to use.Save and close the Visual Basic text entry window.
18.1.2.2. Add a Control Button
Activate the Forms toolbar by clicking on the menu and selecting , and then .
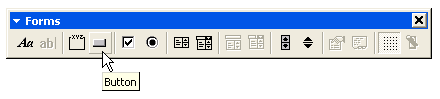
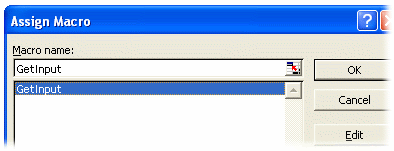
Click on the button icon, and then click in cell D2. (We use this cell in our example, but you can choose another cell if you'd like.) An Assign Macro window should appear.
Select and click .
Change the label on the button to "Get".

For appearance, you can move the button, resize it with the handles, and change the size of the text by right-clicking on it and selecting .
Save the spreadsheet.
18.1.2.3. Receive the data
Now you're ready to receive the data. Open the DataHub Data Browser if it is not already open, go to the
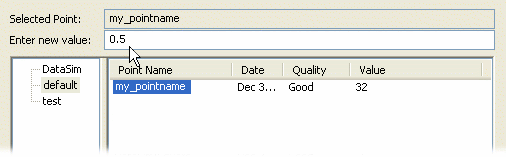
defaultdata domain, and find the name of the point.Click on the point to highlight it. The point name should appear in the Selected Point: field at the top of the Data Browser.
Type a new value for the point into the Enter new value: field and press Enter.
Go to Excel and click the button. You should see the data update each time you click the button.