Chapter 4. Configuring Azure Services

|
The Azure option in the Cogent DataHub™ service for Azure accessible from Remote Config lets user-administrators of the service configure DNS names and firewall rules. |
4.1. DNS Names
Here you can configure DNS names that will allow users to access the system with
an alternate DNS name that you specify using your own DNS servers. When you create a
DataHub for Azure deployment, Microsoft creates a server with a host name that is not
particularly user-friendly, such as
skkynetdemo2-93468441fe4f.eastus.cloudapp.azure.com. Choosing
your own DNS name can better represent your company, product or solution, as well as
being easier to remember and type.
Enabling DNS name support on your DataHub for Azure requires two steps:
Use your DNS server to create a
CNAMErecord for the desired alternate name, routing it to the host name created by Microsoft for your DataHub for Azure service.Use Remote Config to connect to your DataHub for Azure service and add the alternate DNS name to the certificate that the DataHub instance generates that supports SSL web server traffic.
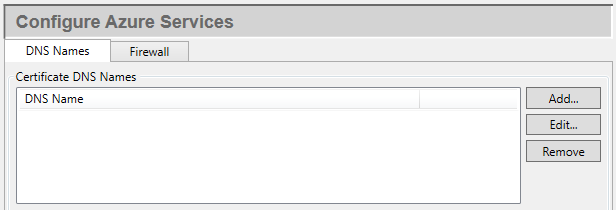
The and buttons open a dialog where you can add a DNS name, or edit the one currently selected. The button removes the selected DNS name.
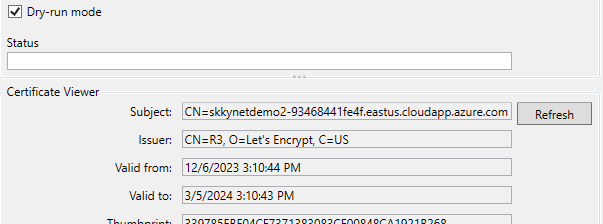
- Dry run mode
Checking this box means that the current certificate will not be replaced. This is useful for testing certificate creation. The certificate creation tool limits the number of certificates that can be generated to a maximum of five per week. This option lets you test certificate creation without risking exceeding the limit. Once you confirm everything is correct, uncheck the checkbox and click to generate and deploy the production certificate. Then re-check the box and click again. This will help avoid accidentally creating another certificate.
- Status
Displays the current status of user interactions with the system. When you click to create a certificate, the results will be displayed in the Status area. Review the messages to confirm the required DNS names have been correctly added to the certificate as alternates.
- Certificate Viewer
Lists details about the certificate. Review the Subject Alternative Names to confirm the certificate includes the alternates DNS names you require.