15.2. TOTP Authentication
15.2.1. Example: RCUser
Here we create a user and give it the necessary permissions and TOTP settings to access and use the DataHub Remote Config application.
Add the user
In the DataHub Properties window, select the option and click the button.
Set the Organization to , and in the Users tab, under Users, click the button and select .

Enter a User Name of
RCUserwith a passwordAbcd1234.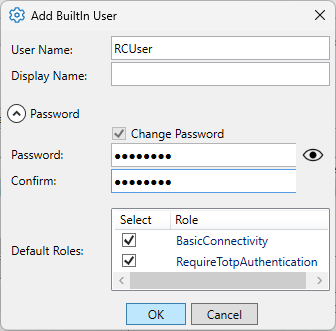
Click the button. The user name RCUser will appear in the Users list, as well as in the Principals list.
In the TOTP (time-based one-time password) section below, click the button, and then click the button.

The system will generate a key.
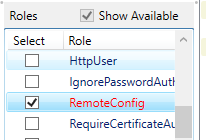
In the Roles list, scroll down to and click its checkbox on.
Click the button to apply your changes. You'll now see a total of 3 roles for RCUser. The
BasicConnectivityandRequireTotpAuthenticaionroles were added by default when the user was created.
Notice that when you click the role checkbox off and on, the list of Effective Permissions in the right-hand column changes. The additional permissions are the ones associated with the RemoteConfig role, showing what the user can do in the Remote Config app. Be sure to leave the checkbox on.
Configure Authenticator app
Since we specified TOTP for the RCUser, we need to configure it. This example will use Microsoft Authenticator as the TOTP app.
On your mobile device, open Authenticator and tap to add an account. Select .
Select .
In the DataHub Security configuration for RCUser, click the button.

Point your phone’s camera at the QR code and enable it. Be sure to apply the changes.
You should now have a entry with RCUser in Windows Authenticator.
Test the results
Start the Remote Config app. Enter the username
RCUserand password. Then check your Authenticator app for the six-digit code, and enter that in the TOTPfield.
Once you've entered both the password string and the TOTP code, press the button to access the app. You can check the Event Log to verify the authentication of RCUser.

To check that permissions are being enforced, start the DataPid app. You will see that it connects, but there are permission denied error messages in Event Log like this:
Error in input: TCP: plugin-raw-message, ..... Permission denied")
Click the button to open the DataHub Data Browser, and you will see that the DataPid domain is either not listed or not connected.
In DataPid, click the button, enter your DataHub
adminusername and password, and click the button.You should now see DataPid data updating in the Data Browser, and no more errors in the Event Log.
![[Note]](images/note_1156523861.png)
We used the
admincredential in this last step to keep the explanation simple. A better approach to pushing data to a DataHub instance is to create a user with specific permissions, as explained in Custom Data Permissions.