3.2. General

|
This first option in the Properties Window lets you control how a DataHub instance starts up, and how changes to data are transmitted. |
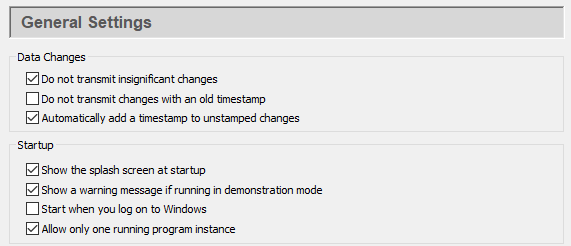
Data Changes
Do not transmit insignificant changes will reduce traffic by allowing only significant changes to the data to be sent. A change is significant if a property of the point other than the time-stamp changes. That normally means a change to either the value or the quality of the point. A change in only the time-stamp is considered insignificant. Some polled data sources change the time-stamp on each cycle, even if the value doesn't change. If network bandwidth is a concern, you can use this option to update the point only when the value has changed.
Do not transmit changes with an old timestamp allows only current or future changes to be sent.
Automatically add a timestamp to unstamped changes stamps the current time onto any changes that haven't already been time stamped.
![[Important]](images/important_2051192373.png) | |
This should stay checked unless you have specific reason to uncheck it.
Unchecking it may cause changes made through DataSim, the Data Browser, and
other programs to receive timestamps of 0 ( |
Startup
Show the splash screen at startup lets you hide or show the start-up screen with the DataHub image.
Show a warning message if running in demonstration mode lets you hide or show the message telling you the demo will terminate in one hour.
Start when you log on to Windows causes a DataHub instance to start up whenever you log on to Windows.
Allow only one running program instance prevents more than one DataHub instance from running at the same time.
Declare these data domains
In this area you can add, edit, or remove data domains for this DataHub instance. For more information about data domains, please refer to Section 21.4.1, “Data Domains”.

To add a data domain, click the button and fill in the name in the Data Domain Name Window:

To change a data domain, double-click it or select it and click the button. To remove a data domain, highlight it and click the button.
Checking the Automatically add data domains requested by clients box automatically adds a data domain whenever a client requests it. If for some reason you want to limit the data domains to those listed, you should make sure this box is not checked.