8.2. Configuring Bridges
It is easy to configure the DataHub program to bridge existing points—just point and click. If necessary, you can quickly configure linear transformations and specify the direction of data flow of the bridge. And should you want to create a new point for a bridge, it's just few more clicks of the mouse. All configuration and any changes are done on the fly, taking effect as soon as you click the button.
8.2.1. Point-to-point configuration
With a DataHub instance running, right click on the DataHub system-tray icon and choose .
In the Properties window, select Bridging.

Click the button. The Bridging Configuration window will open.

The three top panes in this window correspond to the three basic steps in making the configuration: specify a source, a destination, and any desired transformations. The horizontal pane across the bottom shows the bridges that exist on the system.
From the tree diagram in the Source panel, select a source point that you want to bridge.

For example, if you have the DataSim program running, you can select the point Sine in the DataSim data domain. The name of the point gets automatically entered in the field at the top of the panel. Alternatively, you can type the name of the point in the entry field.
In the tree diagram in the Destination panel, select a destination point.
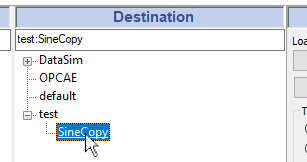
When you select a destination point, its name gets automatically entered in the field at the top of the panel. Or you can type the name of a point in the entry field.
Specify direct copy or transformation.

To make a direct copy, just leave the default selected. To make a linear transformation, select or and enter the appropriate data, as explained in Section 8.2.2, “Making transformations” below.
Determine which direction you want the bridge to apply.
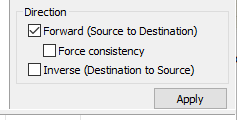
Select to change the destination point when the source point changes, but not change the source when the destination changes. If you select with this option, and if the destination point gets changed for some reason, then the DataHub instance will attempt to force its value to be consistent with the source point value.
Select to change the source point if the destination point changes, but not vice-versa.
![[Note]](images/note_1156523861.png)
Selecting will apply the inverse of the transformation, as explained below.
Select both and for a bidirectional bridge, where either point changes whenever the other point changes. This combination will deselect to eliminate the possibility of conflicting behavior.
Click the button to create and activate the bridge. The DataHub instance will create the bridge and update the bridged points immediately.
In the bottom panel you can see all the bridges that exist in the system, and the significant information about them.

If you click on a transformation, the source point, destination point, and transform information get displayed in their respective panels. Use the check box at the front of each bridge to activate or deactivate it.