7.2. Acting as an OPC UA Client
To configure a DataHub instance to act as an OPC UA client to OPC UA servers, you can follow these steps:
Activating OPC UA
Right click on the DataHub system-tray icon and choose .
In the Properties window, select OPC UA.


Check the box.
Making the Connection
Click the button and fill in the fields in the Configure OPC UA Data Access Server Window:

Connection Name Choose any name, to be used by the DataHub instance to identify the connection. If you leave this blank, names will be assigned incrementally, starting with
OPCUA000,OPCUA001,OPCUA002, etc.For the two next entries there are three different approaches, depending on how this client is able to access the LDS (Local Discovery Server) for the server you want to connect to.
If the LDS appears in the Discovery Domain list:
Discovery Domain Choose the OPC UA Discovery Server to which you want to connect. Click the server refresh button (
 ) if necessary. A list of available
endpoint URLs will appear below.
) if necessary. A list of available
endpoint URLs will appear below.Endpoint URL Choose the appropriate endpoint URL for the protocol that you want to use to connect to the OPC UA Server.
If the LDS does not appear in the Discovery Domain list:
Discovery Domain Type in the computer name or IP address of the computer running the OPC UA server to which you want to connect. Click the server refresh button (
) if necessary. A list of available
endpoint URLs should appear below.Endpoint URL Choose the endpoint URL for the protocol that you want to use to connect to the OPC UA Server. When the LDS returns the endpoint, it will probably contain the computer name instead of the IP address that you typed in, above. If so, you will need to edit it, replacing the computer name with the IP address. If the endpoint URL is not there at all, you can type it in, making sure that you enter the complete name.
If there is no LDS for the server you need to connect to:
Discovery Domain Type in the IP address of the computer running the OPC UA server to which you want to connect.
Endpoint URL Type in the complete name of the endpoint URL that you want to use.
Endpoint URL Searches
For each Discovery Domain, the system will attempt to list its endpoint(s), providing feedback as follows:

Indicates that the endpoint discovery is in process. 
Indicates that the endpoint discovery has failed. 
Indicates that the endpoint discovery has succeeded. If a connection has already been configured, and the Configure OPC UA Data Access Server Window is opened for editing. the Endpoint URL will first appear as previously configured. The DataHub instance will then attempt to validate the endpoint, with the status icon changing first to In Process (
), and then to either Failure ( ) or Success ( ). If at any time you initiate a search by
pressing the server refresh button ( ), and the system fails to locate an endpoint
URL, then it will leave the Endpoint URL entry
field empty.Security Policy If you are working on an untrusted network, and want to use encryption, then choose a security policy. Otherwise, you can leave this at None.
![[Note]](images/note_1156523861.png)
The security options available for each endpoint URL are determined by the OPC UA server configuration.
User Token Type If you want to use authentication, then you can choose a User Token Type. Otherwise, you can leave this at Anonymous.
User Identity This will change depending on the User Token Type (above), allowing for the entry of a certificate file path or a user name and password, as appropriate.
Always accept invalid server certificate: This option tells the client to always accept the server certificate, even if the certificate is invalid, or if it changes in the future.
![[Warning]](images/warning_2116355759.png)
Selecting this option will disable server certificate verification for this connection, exposing the connection to man-in-the-middle attacks. Use with extreme caution.
Continue to accept server certificate when it expires This allows a UA server certificate to be accepted outside of its valid time window, meaning that expired certificates can continue to be used, and that the UA server and client will stay connected if their system clocks ever get out of synch.
If you are using the http protocol along with a security policy, then the clocks on the UA server and client machine must match within 5 minutes at all times. If this is not possible, you should use either the opc:tcp or https protocol.
Do not disconnect when the server reports a failed state By default, if the UA server is in a non-
RUNNINGstate the DataHub instance disconnects and puts a message in the Event Log. Checking this box lets you override that behaviour and maintain the connection to the server.Pause before reading data Lets you specify a time for the DataHub instance to pause before reading the OPC server's data set. Some OPC servers report that they are running, but have not yet constructed their full data set. If the DataHub instance attempts to browse the server immediately after connecting, it might get a partial data set. This option tells the DataHub instance to wait the specified amount of time after a successful connection before it browses the server’s data set.
Connection Test
To test the connection, click the button. The system will open the Connection Test window, and you can watch as it checks the parameters, then creates a channel and session, and then activates the session.
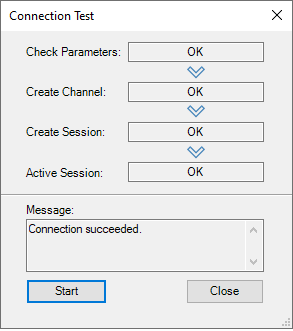
If there is a problem at any point, the Message box will provide some trouble-shooting tips.
Data Transfer
There are several options for specifying how the data is to be transferred: If this is the first time you are configuring an OPC UA client connection, to keep things simple you can keep the default settings for now, and move on to the next step, Selecting Items. Otherwise, you can change the data transfer settings as follows:

Maximum update rate (milliseconds) lets you specify an update rate, useful for slowing down the rate of incoming data. The minimum value is
10. This value is also used as the polling time for asynchronous and synchronous reads (see below).Read Method Choose how to read data from the OPC UA server:
Subscription The DataHub instance registers with the UA server for all configured points, to be received on an event-driven basis. Whenever a point value changes, the new value is sent immediately to the DataHub instance. This option is more efficient than Synchronous Read or Asynchronous Read, and has lower latency than either of them.
Asynchronous Read The DataHub instance polls the UA server for all configured points on a timed interval (set by the Maximum update rate), and does not wait for a reply. This option is less efficient than Subscription, and has higher latency.
Synchronous Cache Read and Synchronous Device Read The DataHub instance polls the UA server for all configured points on a timed interval (set by the Maximum update rate), and this thread waits for a reply. The difference between Synchronous Cache Read and Synchronous Device Read is the maximum age (maxAge). This mimics the cache and device reads in OPC DA, where a device read requests a new read from the underlying device. A device read can be substantially slower than a cache read.
Synchronous Cache Read is approximately equivalent to Asynchronous Read in terms of efficiency and latency. If you are trying to read data at a rate that is near the limit of the server's capability, Synchronous Cache Read is a better choice because it will naturally slow down to what the server can handle, whereas Asynchronous Read will generate overlapping requests that could ultimately result in the connection being closed by the server. For this reason, given a choice between these two, we recommend Synchronous Cache Read.
Write Method Choose how to write data to the OPC UA server:
Asynchronous Write The DataHub instance writes to the UA server and does not wait for a response. This provides the highest overall performance.
Synchronous Write The DataHub instance writes to the UA server and waits for a response each time. This elicits a quicker response for a given item from the UA server, but results in lower overall performance. This option is useful if the UA server doesn't support asynchronous writes at all, or if it can't handle a large number of them.
Monitored Item Queue Size The maximum number of items between polls that get stored on this server.
Maximum Request Item Count lets you reduce the DataHub default of
500to what the server allows. This may be necessary because the OPC UA spec allows a UA server to specify the number of items it will allow per request, which in some cases can be less than 500.Only transmit GOOD quality data to this server restricts point updates from the DataHub instance to the server to only those with "Good" quality.
Do not accept null data from this server restricts point updates from the server to the DataHub instance to only those with non-null values.
Create multiple subscriptions using Maximum Request Item Count The Maximum Request Item Count (above) specifies the maximum number of nodes per subscription. With the Create multiple subscriptions... option checked (the default), the DataHub instance will use this number to decide the maximum number of nodes per subscription. However, if this number is small and the total number of nodes is large then the number of requested subscriptions could exceed the subscription count limit of the server. Unchecking this box will solve that problem by putting all of the nodes into a single subscription.
Load description and engineering unit properties Checking this box will cause the DataHub instance to load any engineering unit and range information associated with each point. These values are then made available to all DataHub clients, and are displayed in the DataHub Data Browser. Activating this feature will increase the time needed for making the initial connection to the server.
Read-only: Mark all items as Read-Only and disable writes to this server lets you specify that the connection to the OPC server be read-only, regardless of how individual items are specified. Items in the DataHub instance that originate from such an OPC server will be read-only to all DataHub clients. The DataHub instance will reject any attempt to force the value of a point when the server is marked as read-only.
Model property children of objects as value types Normally an OPC UA property will be modeled in OPC DA as a property. In OPC UA properties can be direct children of either structural nodes, like objects, or value nodes. Similarly in OPC DA, properties can be direct children of branches or leaves. The DataHub program attempts to preserve this structure as much as possible. However, many OPC DA clients cannot subscribe to properties, making the UA properties inaccessible to those OPC DA subscriptions. Selecting this option will promote OPC UA properties that are direct children of structural nodes to become values, which will in turn promote them to leaf items in OPC DA. This option will not have an effect if the parent of the property is a value node in OPC UA, because promoting the property to be a value child of a value would make it unrepresentable in OPC DA.
Changing this option may require restarting the DataHub instance for its effects to apply.
Please see Advanced for information about advanced options.
Selecting Items
You can select all nodes, select nodes manually, or both.

Load All Nodes on Server With this option you can load all data nodes on the OPC UA server, or filter for groups of nodes.
When you choose this option, the DataHub instance is configured to provide all data nodes, but not the Server nodes. This is done as a convenience, because in most cases few, if any, Server nodes are needed. To additionally get Server nodes, you can select them manually.
Manually Select Nodes Select the option and press the button.
This opens the Configure Nodes window, where you can specify exactly which nodes you wish to use:

You can browse through the tree in the left pane, selecting points as you go. The selections will appear in the right pane. To view sub-branch and leaf items, click the
+sign in front of the item to show the children. You can select many items together like this:Expand all of the branches containing points that you want to add.
Click the name of the first point (not the check box).
Go down to the last point, hold down the Shift key and click the name. All of the names should become highlighted.
Press the Space Bar.
That should select all of the highlighted points. It will not select nodes that are not visible.
Selecting just a branch by itself will not include any of its sub-branches or leaves, but selecting a leaf item will automatically include all of its branches.
In the Remote Config tool, the following options are available:
Left-click the checkbox to select/deselect only that item.
Right-click the checkbox to select/deselect all direct children of that item, but not the item itself.
Control-right-click the checkbox to select/deselect all children of that item recursively, but not the item itself.
Checking the box will ensure that the only nodes you choose are data nodes.
A
+in front of an item does not necessarily mean that the item has children. You must click the+sign to find out.Dynamic Items allow you to explicitly map OPC UA nodes to DataHub point names. Use this when you cannot find the node by browsing, or when the OPC UA server supports dynamically created nodes.
Target NodeId A text string to identify the node in the OPC UA server.
Local Point Name The name of the point within the DataHub instance to map to the Target NodeId.
Copy names from selection When checked, automatically fills in the Target NodeId and Local Point Name fields whenever you select a node in the Selected Nodes list.
Recognize branch delimiter in point name When checked, the Local Point Name will be split using the delimiter character, and a DataHub point hierarchy will automatically be created. For example, if the point name is
Plant1.Tank2.Temperatureand the delimiter is a dot character, then this will automatically create a root branch namedPlant1and a sub-branch withinPlant1namedTank2, then add a point namedTemperaturewithin theTank2branch. When unchecked, the point name will be created without modification in the root of the target data domain.
Changes in this Dynamic Items section are applied to the Selected Nodes list when you press the button.
Data Domain Name lets you specify the name of the DataHub domain into which the data points will be placed.

Click the button to accept the configuration (or Cancel to reject it) and close the Configure OPC UA Data Access Server window.
Click the button in the Properties window to accept the configuration.
The configured client connection will appear in the list, and if the option is selected, the DataHub instance will attempt to connect to the OPC UA server.