2.4.2. Configuring
The button opens the Import Items window:
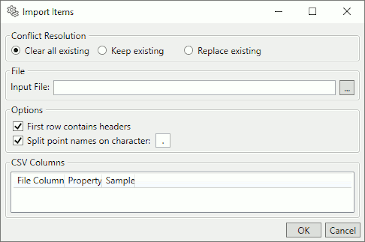
Conflict Resolution
These options let you specify what happens to existing, configured points when new points get loaded from the CSV file.

Removes all existing points, then import the points from the CSV file. The result will be that only the points in the CSV file will remain after the import.
Keeps all existing points, and does not replace any of them from points in the imported CSV file. The result will be a combination of any existing points and the points from the CSV file. Where the CSV file contains the same points, the existing points will take precedence.
Replaces any existing point that has a corresponding point in the imported CSV file. The result will be a combination of the existing points and the points from the CSV file. Where the CSV file contains the same points, the values from the CSV file will take precedence.
File
In the Input File field, choose or enter the file name of the CSV file you plan to import.
Options
There are a few options for the import process.

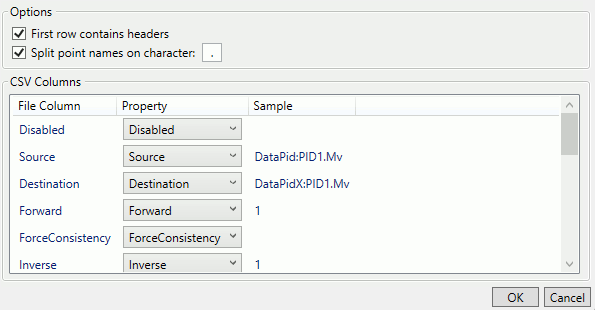
When checked, the system will treat the first row of your CSV file as a header with titles for each column. If this is not checked then the sample data will be presented with generic column names.
When processing a point name, the import can optionally split the point name into path components using the specified character. This allows some interfaces (e.g., OPC DA) to produce a point hierarchy from the point name. In some cases you may have an OPC item name, for example, that provides a multi-level path split on another character (e.g., a
/character). Specifying an alternate split character allows you import those items while constructing hierarchy.
CSV Columns
Each of the different features (OPC DA, OPC UA, Bridging, MQTT Client, Modbus, and Historian) that offers the Import CSV option must be configured according to its unique properties. When you specify the CSV file, the first two rows are loaded and processed. The first row is treated as the headers, and the second row is treated as a sample value. These will then be presented in the CSV Columns list.

You must choose which column in the file corresponds to the properties that the import requires. You may find it convenient to specify the columns in the CSV file in the same order as the properties are displayed when the file is processed.
- File Column
A column title. If you have checked the button (above), then the contents of the first row will appear here. Otherwise, the system will create a title for the column.
- Property
The property of this column. The interface program will provide a drop-down list to choose from. Each feature has different options, explained in Property Lists. You must associate each property with a column in your CSV file. Your CSV file may have extra columns that are not used, so long as it provides all of the columns necessary for the import. For easy configuration, you can use the property names as column headers in your CSV file.
- Sample
Displays the values from the first data row of the file to help with associating the CSV file columns to the properties.
Clicking the button in the Import Items window closes it, and populates the configuration dialog with the CSV file contents.
Example
The first few rows of a CSV file for a Bridging configuration might look like this:

The Import Items configuration would look like this:
Clicking the button would close the Import Items window and populate the DataHub Bridging Configuration window like this:
