10.4. Setting up the DSN (Data Source Name)
A DSN is a Data Source Name. Windows uses this name to identify the database you want to connect to. This tab lets you select an existing DSN, or create a new one if necessary.
In the DataHub Properties window, select Data Logging.

In the Configure Database (ODBC) Data Logging section click the button.

![[Note]](images/note_1156523861.png)
The Data Logging Configuration interface is explained in detail in Section 10.3, “Configuring the Queue, Store and Forward”.
Configure your DSN as explained below.
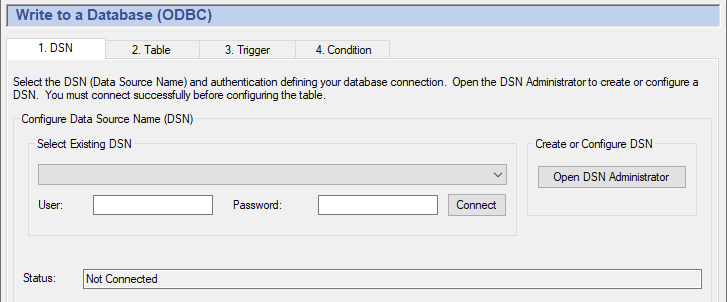
To select a DSN, choose one from the drop-down box, and then enter the user name and password, if applicable.
If your DSN is using Windows Authentication, leave the User and Password fields blank.
Click the button. A "
Connected to
							...
" message should appear in the message box. If you get an error message in the box, consult your system administrator.
| |
Windows has different configuration programs for 32-bit and 64-bit
DSNs. You need to use the 64-bit DSN administrator with 64-bit DataHub
program, or you need to use the 32-bit DSN administrator with 32-bit
DataHub program. The application name,
Despite the apparent mismatch of folder names, those are correct. The DataHub instance will automatically choose the correct version when you select the button. |
To create or configure a DSN, click the button. This opens the ODBC Data Source Administrator window.
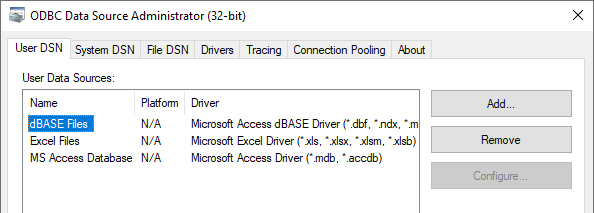
Select the or tab, depending on how you plan to access your database.
A user DSN is only available to the current user account, while a system DSN is available to any user account on the computer.
Now you can add a new database or configure an existing one.
Procedure 10.8. Add a new databaseClick the button. The Create New Data Source window will open, displaying a list of data source drivers.
Select the data source driver that corresponds to your ODBC database. A data source setup window will open. Each data source setup window is different, but you should be able to find the appropriate entry fields easily enough.
Enter the data source name and select the database.
Enter any other required or optional information such as login name, password, etc. What entries need to be made and where they are entered depends on the particular data source setup window you are using.
Click to return to the ODBC Data Source Administrator window. You should be able to see the new database and driver listed. If you need to make any changes, you can configure an exiting database, as explained below.
Procedure 10.9. Configure an existing databaseSelect a data source name and click the button. This takes you to the data source setup window (explained above) where you can make changes to the configuration.
Make your changes and click to return to the ODBC Data Source Administrator window. Any time you need to make a change, you can go to this window.
When you are satisfied everything is correct, click the button to exit the ODBC Data Source Administrator.
Once you have created a DSN, you can select it as explained above.