19.2. Getting Data out of Excel
There are two ways to get data out of Excel and into a DataHub instance;:
Configure a DDEAdvise loop in the DataHub instance that instructs Excel to send data automatically to the DataHub instance any time a value changes.
The data is sent immediately to the DataHub instance, every time the specified cell or range changes. This does not allow any kind of sanity check or safeguard on the data being sent, but in some cases it may be desirable to have Excel emit data automatically.
Each time data is sent for one point (data item), it is sent for all points. This can tie up your network if you have a large number of points. If you need to send data for a large number of cells, you can reduce this effect and reduce CPU load by sending a range that contains the cells.
Write a macro in Excel that uses the DDEPoke command to 'push' data from Excel to the DataHub instance. This allows you to define exactly when the data is sent to the DataHub instance.

19.2.1. Method 1 - Configuring DDEAdvise loops in the DataHub instance
The quickest and easiest method to get data from Excel to the DataHub instance is to configure one or more DDEAdvise loops in the DataHub instance to automatically receive data from Excel, which is acting as a DDE server.
Open an Excel spreadsheet.
Choose a cell or range to hold the data you want to put into the DataHub instance. You will need to refer to your cell or range by row and column number, or by a name. For example, the cell
B2can be referred to asR2C2, or by giving it a name.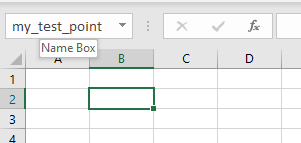
To name a cell or range, select it and enter a unique name the box just above the first column of the worksheet. Then save the worksheet.
Start the DataHub instance if it isn't already started, and open the Properties Window (by right-clicking on the DataHub icon in the Windows system tray and selecting ).
Click the DDE button.

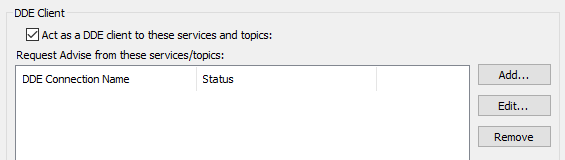
Make sure the box is checked.
![[Important]](images/important_2051192373.png)
For best performance, ensure that a DDE server (in this case, Excel) is running when using the DataHub instance as a DDE client. A DDE client can consume substantial system resources trying to connect if a DDE server is not available.
Click the button. This opens the DDE Item Definition window where you can add Excel as a new DDE service.

Type in the following information:
Connection Name Choose a name to identify this connection. It must be unique among all DDE connections.
Service Type in
Excel.Topic Type the name of your worksheet file. In Windows XP, this name is the same as what is shown after the dash in the title-bar of the Excel spreadsheet. More recent versions of Windows might not show the complete name in the title bar. In any case, you must use the complete file name, so if the worksheet is named, "
Book1", then your Topic is simplyBook1, but if the worksheet is namedTest.xlsthen your Topic needs to beTest.xls.![[Note]](images/note_1156523861.png)
If you want to link to a cell or range which is not on the first sheet in the workbook, you need to put the filename in square brackets, followed by the sheet name. For example, if your worksheet name is
Test.xls:Sheet in workbook Service Topic to enter The first sheet ExcelTest.xlsAn unnamed sheet (e.g. Sheet2) Excel[Test.xls]Sheet2A named sheet (e.g. StockData) Excel[Test.xls]StockDataItem Names Type in the row and column numbers or the name you entered as the cell or range name in Excel (in step 2 above).
Click the button. The fields DDE Item, Point Name and Data Domain are then added to the list of items associated with this DDEAdvise loop. You can continue to add points for other cells in your spreadsheet or click to close the dialog.
The DDE Item is associated with a point in the DataHub instance. You can change the Point Name and Data Domain to anything you want by double clicking on the name and typing a new name. When you click OK, the new point will be created in the DataHub instance;.
Click to close the DDE Item Definition window. The new DDEAdvise loop is added to the list.
Click the button for your changes to take effect. Once you have done this, you should see the DDEAdvise loop connection Status change to Connected.
Open the Data Browser by right clicking the DataHub icon in the system tray and selecting
With the default data domain chosen, scroll down to see the name of the point.
In Excel, type a number into the cell or range you named in step 2, and press Enter. You should see the data update in the Data Browser.
| |
Although this is an easy way to send data from Excel, it is not the most efficient when you have a large number of points to transmit. Whenever Excel transmits a data point using DDEAdvise, it also transmits the current value of every other point associated with any DDEAdvise loop. Where you have a large number of cells to update, we have found it to be much more efficient to transmit the data as Excel ranges. In your DDEAdvise loop, define a range of cells that contains the data you want to transmit. Using Excel ranges will reduce the load on the computer and make it easier to configure your application. |
| |
Another option for reducing the load on the computer when transmitting a large number of points is to write an Excel macro that uses DDEPoke to transmit data on a timed basis, say once a second. Information on how to write a macro in Excel to do this is given below. |
| |
When you save and close a spreadsheet connected to a DataHub instance, and then attempt to reopen it, you may get one or more messages, depending on your security settings in Excel, or other circumstances. Here's a summary of each message, and what to do:
|